Hiển thị các bài đăng có nhãn THỦ THUẬT. Hiển thị tất cả bài đăng

Code Đoc và tải file đính kèm từ Email


Code Đoc và tải file đính kèm từ Email

Chào các bạn, hôm nay mình sẽ giới thiệu các bạn code lấy mail tự động, từ Imap

Đầu tiên tới địa chỉ  http://www.limilabs.com/mail để tải thư viện xử lý Mail
Code đơn giản để nhận thư

using(Pop3 pop3 = new Pop3())

{

    pop3.Connect("pop3.server.com");  // or ConnectSSL for SSL      

    pop3.UseBestLogin("user", "password");


    List<string> uids = pop3.GetAll();
// Lấy tất cả các thư

    foreach (string uid in uids)

    {

        IMail email = new MailBuilder()

            .CreateFromEml(pop3.GetMessageByUID(uid));

        Console.WriteLine(email.Subject);

    }

    pop3.Close();
}
Nâng cao
Bộ lọc: Nhận các thư trong khoảng thời gian và tiêu đề nhập vào
1)  Tạo mail
Email email = new Email (mailServer, email, passwordEmail, subjectEmail, attachedFileTypes, onDate);
2)  Kết nối và lấy nội dung thư theo ID với email được truyền từ bước 1. Hãy đảm bảo rằng Mail của bạn đã được cấu hình Bật IMap nhé

public override List<SaveFile> DownLoadFileAttachment(Email email)
        {
            List<SaveFile> listSavedFiles = new List<SaveFile>();
            using (Imap imap = new Imap())
            {
                try
                {
                    imap.ConnectSSL(email.MailServer);
                    imap.Login(email.UserName, email.Password);

                    if (imap.Connected)
                    {
                        DateTime fromDate = DateTime.Today;
                        DateTime toDate = DateTime.Today;
                        if (!string.IsNullOrEmpty(email.FromDate))
                        {
                            fromDate = DateTime.Parse(email.FromDate);
                        }

                        if (!string.IsNullOrEmpty(email.ToDate))
                        {
                            toDate = DateTime.Parse(email.ToDate);
                        }

                        if (!string.IsNullOrEmpty(email.OnDate))
                        {
                            fromDate = DateTime.Parse(email.OnDate).Date;
                            toDate = DateTime.Parse(email.OnDate).Date.AddDays(1);
                        }

                        imap.SelectInbox();
                        List<long> listUIDS = GetEmailUIDS(imap, email);
// Lấy tất cả các mail theo điều kiện thỏa mãn của mail ở bước 1
                        foreach (long uid in listUIDS)
                        {
                            string eml = imap.GetMessageByUID(uid);
                            IMail mail = new MailBuilder().CreateFromEml(eml);
                            if (mail != null && mail.Date.HasValue)
                            {
                                if (mail.Date.Value.Date >= fromDate && mail.Date.Value.Date <= toDate)
                                {
                                    listSavedFiles.AddRange(SaveFile(mail, email));
                                }
                            }
                        }
                    }
                }
                catch (Exception ex)
                {
                    Logger.WriteErrorLog(LogPath, ex, null);
                }
                finally
                {
                    imap.Close();
                }
            }

            return listSavedFiles;
        }

Cài đặt SMTP cho WordPress

Trong bài hướng dẫn thiết lập SMTP riêng cho WordPress, mình thấy có rất nhiều bạn đang gặp khó khăn trong việc lấy thông tin SMTP của Gmail để làm server gửi mail trong WordPress, mặc dù việc này rất dễ dàng để làm được.
Bạn nên làm hướng dẫn này ở localhost, nếu ở localhost làm được mà lên host lại không được thì nhà cung cấp của bạn đã chặn luôn cổng SMTP.
Vậy thì trong bài này, mình sẽ hướng dẫn cách thiết lập SMTP từ Gmail chi tiết nhất để bạn có thể làm theo, dĩ nhiên mình đã sử dụng từ rất lâu mà không thấy vấn đề gì, ngoài việc bị giới hạn gửi 2000 email/ngày.
Để thiết lập SMTP chính xác như trong bài này, bạn cần bật chức năng mật khẩu hai lớp (2-Step Verification) cho tài khoản nếu bạn chưa bật, bằng cách vào https://myaccount.google.com/.
Tại đây, bạn vào phần Signing in to Google (Đăng nhập vào Google).
signing-in-to-Google
Rồi chọn bật chức năng bảo mật hai lớp.
baomat2lop-google
Sau khi bật xong, bạn vào lại phần Signing in to Google như ở trên và chọn Mật khẩu ứng dụng.
matkhauungdung-google
Hãy nhấp thẳng vào mục đó, sau đó kéo xuống dưới chọn Select app là Mail và Select device bạn chọn cái gì cũng được, rồi ấn Generate.
gmail-smtp-02
Sau đó nó sẽ cho bạn một dãy ký tự, hãy bôi đen và copy toàn bộ nó, đây chính là mật khẩu SMTP của bạn.
gmail-smtp-03
Bây giờ bạn vào website WordPress, cài plugin WP SMTP và thiết lập như sau:
gmail-smtp-04
Trong đó, bạn cần lưu ý:
  • Chọn phương thức bảo mật là SSL
  • Port là 465
  • SMTP Host là smtp.gmail.com
  • Username phải là địa chỉ email của bạn thuộc tài khoản đã lấy App Password
  • Password chính là App Password của bạn vừa lấy ở trên
Nếu chọn port là 465 với SSL không được thì bạn hãy chọn port 587 với TLS.
Sau đó ấn lưu lại.
Bây giờ bạn có thể sử dụng chức năng test phía dưới để gửi một email đến một địa chỉ nào đó, nếu nó gửi được thì thành công.
gmail-smtp-05
Chúc các bạn thành công!
Nguồn: http://thachpham.com/

Allow Multiple Remote Desktop Sessions – Windows 10

Enabling Concurrent Sessions allows you to Remote Desktop into a PC that someone else is on, under a different user account, and access the system without disconnecting the current logged user
Remember that to remotely connect over the Internet you must configure your router to forward incoming RDP connections to the proper PC IP Address
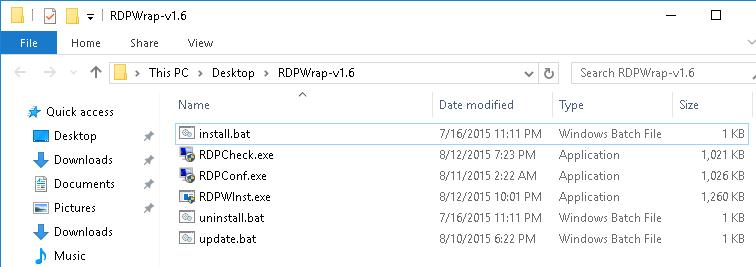
1. To enable concurrent desktop sessions in Windows 10 is really simple all you need to do isdownload and extract RDP Wrapper Library v1.6.
 RDPWrap-v1.6
2. Once extracted locate Install batch file right click and run as administrator. If prompted click yes to the (UAC).
3. Once the Install batch file finishes, run the RDPConf as administrator. To open the Configuration. If prompted click yes to the (UAC).
Here make sure your configuration looks exactly like the following image:
Allow-multiple-RDP-windows-10-4
Click apply button. Now Windows 10 is configured for multiple Remote Desktop Access.

Video Tutorial:

3 cách khắc phục khi không vào được Facebook và YouTube

Vào một ngày đẹp trời cơ quan bạn tự dưng chặn nhân viên truy cập vào những trang rất phổ biến như Facebook, Youtube,..Thật không thể tin nổi! quá buồn phải không? Vậy làm thế nào để khắc phục vấn đề và vượt qua thử thách này một cách êm ái?
Khi tìm kiếm từ khóa “cách vào facebook” trên Google, bạn sẽ thấy có rất nhiều kết quả trả về, tuy nhiên đa phần các bài viết này đều hướng dẫn người dùng đổi DNS, thêm các dãy IP vào file hosts hoặc cấu hình VPN (mạng riêng ảo). Các bước thực hiện tương đối phức tạp, đặc biệt là đối với những không rành công nghệ.
Dưới đây mình sẽ hướng dẫn một vài cách đơn giản để khắc phục vấn đề này:

1. Unlimited Free VPN - Hola
Đây là một Extension của trình duyệt Google Chrome. Bạn thêm extension này vào trình duyệt của bạn theo link sau: https://chrome.google.com/webstore/detail/unlimited-free-vpn-hola/gkojfkhlekighikafcpjkiklfbnlmeio?hl=en-US

Sau khi đã add vào sẽ xuất hiện 1 biểu tượng mặt cười nhỏ như hình bên dưới, và chọn một country (ở Việt nam thì bạn nên chọn Singapore để có tốc độ truy cập nhanh).
Xong. Và đây là kết quả truy cập Facebook (mình chọn Country là United States)


Còn đây là Youtube:

2. SBRO Safe Gate
SBRO Safe Gate là một tiện ích miễn phí cho trình duyệt Chrome, hoạt động tương tự như một phần mềm VPN, giúp người dùng truy cập an toàn hơn khi lướt web. Để cài đặt, bạn hãy truy cập vào địa chỉ https://sbro.me/en/, nhấn Add to Chrome > Add extension.
Sau khi hoàn tất, bạn hãy nhấn vào biểu tượng của SBRO Safe Gate ở cuối thanh địa chỉ, lựa chọn máy chủ (Singapore, Amsterdam và New York) rồi nhấn Activate Proxy for this tab để kích hoạt, lúc này biểu tượng của tiện ích sẽ sáng lên.
Chỉ kích hoạt proxy trên các tab do người dùng chỉ định. Ảnh: MH
Không giống như các phần mềm khác, SBRO Safe Gate chỉ áp dụng proxy lên các thẻ do người dùng chỉ định, do đó tốc độ lướt web tổng thể sẽ không bị ảnh hưởng. Ngoài ra, nếu muốn an toàn hơn, bạn có thể đánh dấu chọn vào ô Hide my browser User-Agent.
3. Opera
Vừa qua, Opera đã chính thức tích hợp thêm VPN (Virtual Private Network, tạm dịch là mạng riêng ảo) vào trong trình duyệt, cho phép bạn sử dụng VPN hoàn toàn miễn phí, ẩn địa chỉ IP và bảo mật hơn khi sử dụng Wi-Fi công cộng.
Đầu tiên, bạn truy cập vào http://www.opera.com/developer và tải về phiên bản Opera dành cho nhà phát triển. Khi hoàn tất, bạn bấm vào biểu tượng Opera, chọnPreferences > Privacy & security rồi đánh dấu chọn ở ô Enable VPN. Lưu ý, hiện tại tính năng này chỉ mới có trên phiên bản dành cho nhà phát triển.
Kích hoạt VPN trên Opera. Ảnh: MH
Sau đó, bạn hãy thử truy cập vào Facebook, kích vào chữ VPN ở đầu thanh địa chỉ và lựa chọn máy chủ cần sử dụng. So với các ứng dụng khác thì VPN của Opera hoàn toàn miễn phí và không giới hạn dung lượng.
Nếu đang xài smartphone, bạn chỉ cần cài thêm ứng dụng Opera trên Google Play là sẽ vào được Facebook. Thêm vào đó, bạn cũng nên vào Settings của trình duyệt, nhấn vào mục Opera Turbo và chọn Always On để lướt Facebook nhanh hơn.
Dễ dàng truy cập vào Facebook hay các trang web bị chặn với Opera. Ảnh: MH
Ngoài ra, bạn cũng có thể sử dụng trình duyệt Tor (https://goo.gl/XEQ80) để truy cập vào Facebook cũng như các trang web khác.

Có sươu tầm thêm nguồn: http://kynguyenso.plo.vn/

Soạn bài viết cho Blog cực nhanh với văn bản và ảnh chụp upload trực tiếp


Ưu điểm:
- Soạn bài cực nhanh.
- Ảnh được chụp và lưu trực tiếp lên server của mình (ở đây là tài khoản google drive của mình).
- Ảnh được lưu mãi mãi trong google drive.
- Có thể dùng một file google doc để soạn nội dung cho mọi bài blog, cứ mỗi lần soạn cho bài khác thì lại xóa nội dung cũ đi.
- Áp dụng post bài cho mọi nền tảng Blog.

Những thứ cần chuẩn bị:
- Một bài viết trên blogger hoặc nền tảng khác, cái này chắc chắn rồi.
- Phần mềm chụp ảnh/quay phim màn hình Snagit.
- Tạo một file google doc online.


Ngoài ra bạn có thể sử dụng công cụ Open Live Writer chuyên để soạn thảo cho Blog tại đây. Nhưng kinh nghiệm cho thấy nó tương đối chậm khi publish bài viết với 1 vài ảnh, và thực sự nó không thể tốt bằng cách ở trên.

Trương Đức Tài.

How to Add Numbered Page Navigation Widget for Blogger

In Blogger, we have the option to set the number of posts we want to display per page by going to the Settings menu > Posts and comments > Show at most ? posts. Once the number of total posts in our blog exceeds this number, we will see "Older Posts" and "Newer Posts" navigation links in our home page and archive pages footer as Blogger doesn't have any built-in function on page numbering. But page numbers instead of older and newer posts links could help our blog visitors to navigate quicker (jump from one page to another page or click on a specific page) and know the total number of posts published. Here's a tutorial on how to add numbered page navigation using Javascript to a Blogger/ blogspot blog. You can select any one of the 7 different styles that I have mentioned below.

numbered page navigation widget

Adding Numbered Page Navigation to Blogger

You can add this widget in just two steps.
1. Adding The CSS.
2. Adding The Script.

Now let's see how to add the CSS style for page navigation.

1. Adding The CSS

Step 1. Go to Blogger Dashboard > Template > click on the Edit HTML button:

blogger template html

Step 2. Click anywhere inside the code area and press the CTRL + F keys to open the Blogger search box.


... type or paste the following tag inside the search box and hit Enter to find it:
]]></b:skin>
Step 3. Now choose one of the following numbered page navigation styles and copy the code just below it. Just above ]]></b:skin> paste the code of the style that you want to use:

Style 1

numbered page navigation style 1
#blog-pager{clear:both;margin:30px auto;text-align:center; padding: 7px;}
.blog-pager {background: none;}
.displaypageNum a,.showpage a,.pagecurrent{padding: 3px 7px;margin-right:5px;background:#E9E9E9;color: #888;border:1px solid #E9E9E9;}
.displaypageNum a:hover,.showpage a:hover,.pagecurrent{background:#CECECE;text-decoration:none;color: #000;}
.showpageOf{display:none!important}
#blog-pager .showpage, #blog-pager .pagecurrent{font-weight:bold;color: #888;}
#blog-pager .pages{border:none;}

Style 2:

numbered page navigation style 2
#blog-pager{clear:both;margin:30px auto;text-align:center; padding: 7px;}
.blog-pager {background: none;}
.displaypageNum a,.showpage a,.pagecurrent{padding: 5px 10px;margin-right:5px; color: #F4F4F4; background-color:#404042;-webkit-box-shadow: 0px 5px 3px -1px rgba(50, 50, 50, 0.53);-moz-box-shadow:0px 5px 3px -1px rgba(50, 50, 50, 0.53);box-shadow: 0px 5px 3px -1px rgba(50, 50, 50, 0.53);}
.displaypageNum a:hover,.showpage a:hover, .pagecurrent{background:#EC8D04;text-decoration:none;color: #fff;}
#blog-pager .showpage, #blog-pager, .pagecurrent{font-weight:bold;color: #000;}
.showpageOf{display:none!important}
#blog-pager .pages{border:none;-webkit-box-shadow: 0px 5px 3px -1px rgba(50, 50, 50, 0.53);-moz-box-shadow:0px 5px 3px -1px rgba(50, 50, 50, 0.53);box-shadow: 0px 5px 3px -1px rgba(50, 50, 50, 0.53);}

Style 3:

numbered page navigation style 3
#blog-pager{clear:both;margin:30px auto; padding: 7px; text-align:center;font-size: 11px;background-image: -webkit-gradient(linear,left bottom,left top,color-stop(0, #000000),color-stop(1, #292929));background-image: -o-linear-gradient(top, #000000 0%, #292929 100%);background-image: -moz-linear-gradient(top, #000000 0%, #292929 100%);background-image: -webkit-linear-gradient(top, #000000 0%, #292929 100%);background-image: -ms-linear-gradient(top, #000000 0%, #292929 100%);background-image: linear-gradient(to top, #000000 0%, #292929 100%); padding: 6px;-webkit-border-radius: 3px;-moz-border-radius: 3px;border-radius: 3px;}
.blog-pager {background: none;}
.displaypageNum a,.showpage a,.pagecurrent{padding: 3px 10px;margin-right:5px; color: #fff;}
.displaypageNum a:hover,.showpage a:hover,.pagecurrent{background-image: -webkit-gradient(linear,left bottom,left top,color-stop(0, #59A2CF),color-stop(1, #D9EAFF));background-image: -o-linear-gradient(top, #59A2CF 0%, #D9EAFF 100%);background-image: -moz-linear-gradient(top, #59A2CF 0%, #D9EAFF 100%);background-image: -webkit-linear-gradient(top, #59A2CF 0%, #D9EAFF 100%);background-image: -ms-linear-gradient(top, #59A2CF 0%, #D9EAFF 100%);background-image: linear-gradient(to top, #59A2CF 0%, #D9EAFF 100%);text-decoration: none;color: #000;-webkit-border-radius: 3px;-moz-border-radius: 3px;border-radius: 3px;}
.showpageOf{display:none!important}.blog-pager-older-link, .home-link, .blog-pager-newer-link {background: transparent;}
a.blog-pager-older-link, a.home-link, a.blog-pager-newer-link {color: #fff;}
#blog-pager .pages{border:none;background: none;}

Style 4:

numbered page navigation style 4
#blog-pager{clear:both;margin:30px auto;text-align:center; padding: 7px;}
.blog-pager {background: none;}
.displaypageNum a,.showpage a,.pagecurrent{font-size: 14px;padding: 5px 12px;margin-right:5px; color: #666; background-color:#eee;}
.displaypageNum a:hover,.showpage a:hover, .pagecurrent{background:#359BED;text-decoration:none;color: #fff;}
#blog-pager .pagecurrent{font-weight:bold;color: #fff;background:#359BED;}
.showpageOf{display:none!important}
#blog-pager .pages{border:none;}

Style 5

numbered page navigation style 5
#blog-pager{clear:both;margin:30px auto;text-align:center; padding: 7px; }
.blog-pager {background: none;}
.displaypageNum a,.showpage a,.pagecurrent{font-size: 13px;padding: 5px 12px;margin-right:5px; color: #3E5801; background-color:#E0EDC1;}
.displaypageNum a:hover,.showpage a:hover, .pagecurrent{background:#FEF6DF;text-decoration:none;color: #E16800;}
#blog-pager .pagecurrent{font-weight:bold;color: #D25E71;background:#FFDEDF;}
.showpageOf{display:none!important}
#blog-pager .pages{border:none;}

Style 6

numbered page navigation style 6
#blog-pager{clear:both;margin:30px auto;text-align:center; padding: 7px; }
.blog-pager {background: none;}
.displaypageNum a,.showpage a,.pagecurrent{font-size: 13px;padding: 5px 12px;margin-right:5px; color: #AD0B00; background-color:#FAB001;}
.displaypageNum a:hover,.showpage a:hover, .pagecurrent{background:#DB4920;text-decoration:none;color: #fff;}
#blog-pager .pagecurrent{font-weight:bold;color: #fff;background:#DB4920;}
.showpageOf{display:none!important}
#blog-pager .pages{border:none;}

Style 7

numbered page navigation style 7
#blog-pager{clear:both;margin:30px auto;text-align:center; padding: 7px; }
.blog-pager {background: none;}
.displaypageNum a,.showpage a,.pagecurrent{font-size: 12px;padding: 5px 12px;margin-right:5px; color: #222; background-color:#eee; border: 1px solid #EEEEEE;}
.displaypageNum a:hover,.showpage a:hover, .pagecurrent{background:#E5E5E5;text-decoration:none;color: #222;}
#blog-pager .pagecurrent{font-weight:bold;color: #fff;background:#DB4920;}
.showpageOf{display:none!important}
#blog-pager .pages{border:none;}
Note: if you want to hide the "First" and "Last" buttons add this line below the CSS code:
.firstpage, .lastpage {display: none;}

2. Adding The Script

Step 4. Now find (CTRL + F) this tag:
</body>
UPDATED! Working version for more than 500 posts:

Step 5. Add the following script just above it:
<b:if cond='data:blog.pageType != &quot;item&quot;'>
<b:if cond='data:blog.pageType != &quot;static_page&quot;'>
<script type='text/javascript'>
 /*<![CDATA[*/
var perPage=7;
var numPages=6;
var firstText ='First';
var lastText ='Last';
var prevText ='« Previous';
var nextText ='Next »';
var urlactivepage=location.href;
var home_page="/";
 /*]]>*/
</script>
 <script src="http://helplogger.googlecode.com/svn/trunk/page-navigation2.js"/>
</b:if>
</b:if>

Configuration

After installing, you might want to change these default settings:
perPage: 7,
numPages: 6,
var firstText ='First';
var lastText ='Last';
var prevText ='« Previous';
var nextText ='Next »';
}
1) perPage: how many posts will be shown in each page (7). This value has to be the same as the number of posts on the main page. Otherwise, add the same number by going to "Settings" > "Formatting" and type it in the "Show at most" field, then click on the "Save Settings" button.
2) numPages: how many pages will be shown in the page navigation (6)
3) to replace the 'First', 'Last', "« Previous" and "Next »" texts, just type your own within the quotes.

Labels fix:

By default, Blogger will show 20 posts on label pages. To make this widget appear on label pages, we will have to cut down this down to the value that we gave for the perPage variable.

Find each occurrence of the following code snippet:
expr:href='data:label.url'
Replace it with this one below:
expr:href='data:label.url + "?&amp;max-results=7"'
Here 7 is the number of posts to be displayed per page.

Step 8. Click on the Save Template button and that's it! Enjoy!

Source from: http://helplogger.blogspot.com/2014/04/how-to-add-numbered-page-navigation-widget-for-blogger.html